就是这个东西
1.添加模型
1 2 3 4 5 6 7 8 9 10 11 | const url = "Apps/model/leida.glb"; const pos = Cesium.Cartesian3.fromDegrees(110, 40, 150); const matrix = Cesium.Transforms.eastNorthUpToFixedFrame(pos); const model = viewer.scene.primitive.add( Cesium.Model.fromGltf({ url: url, modelMatrix: matrix }) ); }); viewer.camera.lookAtTransform(matrix, new Cesium.Cartesian3(-50, 0, 800)); |

2.画坐标轴
2.1 定义箭头线
坐标轴看上去是个带箭头的线,但是Cesium并没有定义箭头线的几何对象,Entity倒是可以给一个箭头材质,但是模型旋转平移涉及复杂的矩阵变换,所以Entity并不是一个好的选择,用Entity也许你能很方便的画出坐标轴,但是矩阵变换估计能把你整晕了,因此我们宁愿画坐标轴的时候多花点心思。下面是我基本Primitive封装的一个箭头线,实现的原理是一个圆柱加一个圆锥。
1 2 3 4 5 6 7 8 9 10 11 12 13 14 15 16 17 18 19 20 21 22 23 24 25 26 27 28 29 30 31 32 33 34 35 36 37 38 39 40 41 42 43 44 45 46 47 48 49 50 51 52 53 54 55 56 57 58 59 60 61 62 63 64 65 66 67 68 | export default class ArrowPolyline { /** * 箭头线 */ constructor(option = {}) { this._color = option.color || Cesium.Color.RED; this._width = option.width || 3; this._headWidth = option.headWidth || 2 * this._width; this._length = option.length || 300 this._headLength = option.headLength || 10 this._inverse = option.inverse || false this.position = option.position const id = option.id //这里用的是圆锥几何对象,当topRadius和bottomRadius相同时,它就是一个圆柱 const line = Cesium.CylinderGeometry.createGeometry(new Cesium.CylinderGeometry({ length: this._length, topRadius: this._width, bottomRadius: this._width })); const arrow = Cesium.CylinderGeometry.createGeometry(new Cesium.CylinderGeometry({ length: this._headLength, topRadius: 0, bottomRadius: this._headWidth })); let offset = (this._length + this._headLength) / 2 if (this._inverse) { offset = -offset } ArrowPolyline.translate(arrow, [0, 0, offset]); return new Cesium.Primitive({ modelMatrix: Cesium.Transforms.eastNorthUpToFixedFrame(this.position), geometryInstances: [new Cesium.GeometryInstance( { id: id + '-line', geometry: line, } ), new Cesium.GeometryInstance({ id: id + '-arrow', geometry: arrow, })], appearance: new Cesium.MaterialAppearance({ material: Cesium.Material.fromType('Color', { color: this._color }) }) }); } /** * 按上面的方法画出的箭头在线的中间,我们需要把它平移到线的一端 */ static translate = function (geometry, offset) { const scratchOffset = new Cesium.Cartesian3(); if (Cesium.isArray(offset)) { scratchOffset.x = offset[0]; scratchOffset.y = offset[1]; scratchOffset.z = offset[2]; } else { Cesium.Cartesian3.clone(offset, scratchOffset); } for (let i = 0; i < geometry.attributes.position.values.length; i += 3) { geometry.attributes.position.values[i] += scratchOffset.x; geometry.attributes.position.values[i + 1] += scratchOffset.y; geometry.attributes.position.values[i + 2] += scratchOffset.z; } } } |
2.2 以模型中心为原点创建坐标轴
1 2 3 4 5 6 7 8 9 10 11 12 13 14 15 16 17 18 19 20 21 22 23 24 25 26 27 28 29 30 31 32 33 34 35 36 37 38 39 | model.readyPromise.then(m => { const center1 = Cesium.Matrix4.getTranslation( m.modelMatrix, new Cesium.Cartesian3() ); //必须在模型加载完成后才能读到boundingSphere属性 const boundingShpere = m.boundingSphere; const radius = boundingShpere.radius const axisZ = new GV.ArrowPolyline({ id: "axisZ", color: Cesium.Color.RED, position: center1, width: 3, headWidth: 5, length: radius * 2 + 50,//坐标轴的长度应该视模型的直径而定 headLength: 10 }); const axisX = new GV.ArrowPolyline({ id: "axisX", color: Cesium.Color.GREEN, position: center1, width: 3, headWidth: 5, length: radius * 2 + 50, headLength: 10 }); const axisY = new GV.ArrowPolyline({ id: "axisY", color: Cesium.Color.BLUE, position: center1, width: 3, headWidth: 5, length: radius * 2 + 50, headLength: 10 }); viewer.scene.primitives.add(axisZ) viewer.scene.primitives.add(axisX) viewer.scene.primitives.add(axisY) }); |
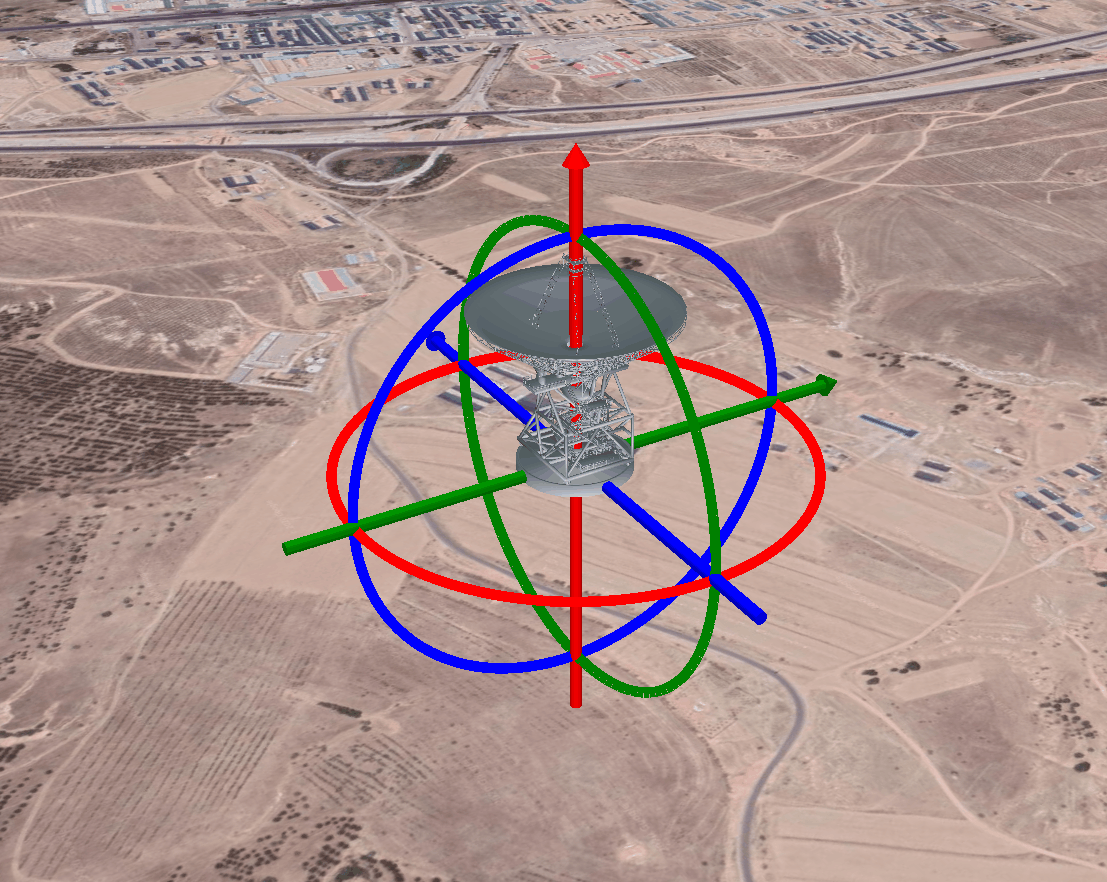
三个坐标轴已经创建完了,但是如果你打开浏览器应该只看到一条轴,应该它们是重叠在一起的,并且方向朝上,也就是说我们画了三条Z轴,以右手坐标系为例,Z轴绕Y轴逆时针旋转90度到到X轴,Z轴绕X轴旋转逆时针旋转90度得到Y轴。因此对X、Y轴做矩阵变换 。
1 2 3 4 5 6 7 8 9 10 11 12 13 14 15 16 17 18 19 20 21 22 23 24 25 26 27 28 29 30 31 32 33 34 35 36 37 38 39 40 41 42 43 44 45 46 47 48 49 50 51 52 53 54 55 56 57 58 59 60 61 62 63 | model.readyPromise.then(m => { const center1 = Cesium.Matrix4.getTranslation( m.modelMatrix, new Cesium.Cartesian3() ); const boundingShpere = m.boundingSphere; const radius = boundingShpere.radius const axisZ = new GV.ArrowPolyline({ id: "axisZ", color: Cesium.Color.RED, position: center1, width: 3, headWidth: 5, length: radius * 2 + 50, headLength: 10 }); const axisX = new GV.ArrowPolyline({ id: "axisX", color: Cesium.Color.GREEN, position: center1, width: 3, headWidth: 5, length: radius * 2 + 50, headLength: 10 }); const axisY = new GV.ArrowPolyline({ id: "axisY", color: Cesium.Color.BLUE, position: center1, width: 3, headWidth: 5, length: radius * 2 + 50, headLength: 10 }); const mx = Cesium.Matrix3.fromRotationY(Cesium.Math.toRadians(90)); const rotationX = Cesium.Matrix4.fromRotationTranslation(mx); Cesium.Matrix4.multiply( axisX.geometryInstances[0].modelMatrix, rotationX, axisX.geometryInstances[0].modelMatrix ); Cesium.Matrix4.multiply( axisX.geometryInstances[1].modelMatrix, rotationX, axisX.geometryInstances[1].modelMatrix ); const my = Cesium.Matrix3.fromRotationX(Cesium.Math.toRadians(90)); const rotationY = Cesium.Matrix4.fromRotationTranslation(my); Cesium.Matrix4.multiply( axisY.geometryInstances[0].modelMatrix, rotationY, axisY.geometryInstances[0].modelMatrix ); Cesium.Matrix4.multiply( axisY.geometryInstances[1].modelMatrix, rotationY, axisY.geometryInstances[1].modelMatrix ); viewer.scene.primitives.add(axisZ) viewer.scene.primitives.add(axisX) viewer.scene.primitives.add(axisY) }); |

3.创建围绕坐标轴的圆
这里肯定有很多方法,我的实现思路以模型中心为圆心,模型半径为半径画圆。
3.1 定义创建坐标圆的方法
1 2 3 4 5 6 7 8 9 10 11 12 13 14 15 16 17 18 19 20 | function createAxisSphere(id, position, matrix, color) { const geometry = new Cesium.PolylineGeometry({ positions: position, width: 10 }); const instnce = new Cesium.GeometryInstance({ geometry: geometry, id: id, attributes: { color: Cesium.ColorGeometryInstanceAttribute.fromColor(color) } }); return new Cesium.Primitive({ geometryInstances: instnce, appearance: new Cesium.PolylineColorAppearance({ translucent: false }), modelMatrix: matrix }); } |
3.2 计算圆周坐标
1 2 3 4 5 6 7 8 | const position = []; for (let i = 0; i <= 360; i += 3) { const sin = Math.sin(Cesium.Math.toRadians(i)); const cos = Math.cos(Cesium.Math.toRadians(i)); const x = radius * cos; const y = radius * sin; position.push(new Cartesian3(x, y, 0)); } |
3.3 创建坐标轴圆弧
1 2 3 4 5 6 7 8 9 10 11 12 13 14 15 16 17 18 19 20 21 22 23 24 25 26 27 28 29 30 31 | const axisSphereZ = self.createAxisSphere( "axisSphereZ", position, matrix, Cesium.Color.RED ); viewer.scene.primitives.add(axisSphereZ); const axisSphereY = self.createAxisSphere( "axisSphereY", position, matrix, Cesium.Color.GREEN ); viewer.scene.primitives.add(axisSphereY); Cesium.Matrix4.multiply( axisSphereY.geometryInstances.modelMatrix, rotationY, axisSphereY.geometryInstances.modelMatrix ); const axisSphereX = self.createAxisSphere( "axisSphereX", position, matrix, Cesium.Color.BLUE ); viewer.scene.primitives.add(axisSphereX); Cesium.Matrix4.multiply( axisSphereX.geometryInstances.modelMatrix, rotationX, axisSphereX.geometryInstances.modelMatrix ); |

4.结语
至此,最前面展示的内容就已经完成了,剩下的就是交互了,前面已经写过了,具体请参考
Cesium从入门放弃7:模型矩阵变换